Can You Build a Fire Pit on a Wood Deck? Here’s How to Do It Right
If you’ve been wondering how to build a fire pit on a wood deck, the short answer is: it can be done, but only when you follow code, use the right equipment, and protect the deck from heat and embers. Below is a practical, step-by-step guide focused on planning, safety, materials, and construction so your deck stays beautiful—and your gatherings stay worry-free.
Is It Actually Safe to Put a Fire Pit on a Wood Deck?
The Bottom Line
A fire pit can be used on a wood deck only when the unit is approved for use on combustible surfaces, clearances are respected, and a non-combustible base and heat protection are installed. Local rules may further limit or prohibit open flames on decks and balconies, so always check your local authority first.
What The Codes And Safety Experts Say
Modern fire codes restrict open-flame devices on or near combustible construction (including many decks). Even when allowed at single-family homes, common rules require separation from siding, railings, and overhangs. Safety organizations also advise keeping outdoor flames at least 10 feet (3 m) from anything that can burn.
Why Wood Decks Need Special Care
Deck boards and debris between boards can ignite from embers and radiant heat. Testing shows certain deck products are more vulnerable to ember ignition, and even small accumulations of leaves or needles can contribute to fire spread. Keeping gaps clean and using non-combustible layers beneath the pit are essential.
Plan First: Permits, Fuel Type, and Location
Confirm Local Rules And HOA Policies
Before buying materials, verify what’s allowed in your area. Many jurisdictions restrict open flames on combustible balconies or require increased clearances and supervision. Apartment and multifamily settings often face the strictest limits. When in doubt, ask your local fire department.
Choose The Safest Fuel For A Deck
For decks, a listed gas fire pit that’s rated for use on combustible surfaces is generally the safest option. Wood-burning pits throw sparks and produce heavier embers, increasing risk. If wood burning is allowed where you live and you choose to use it, a spark screen, ash control, and robust heat shielding are non-negotiable. Always follow the manufacturer’s manual for the exact model you install.
Pick A Spot With Ample Clearance
Position the fire feature away from siding, posts, planters, and furniture. Many resources and manufacturers specify minimum side and overhead clearances that often range from a foot or more on the sides to several feet above, with additional distance to nearby walls and railings. If a general rule helps: keep at least 10 feet from structures and overhead branches unless your listing manual requires even more. Never place a flame under umbrellas, pergola canopies, or awnings.
Materials That Protect a Wood Deck From Heat
The Non-combustible Platform (Your Top Priority)
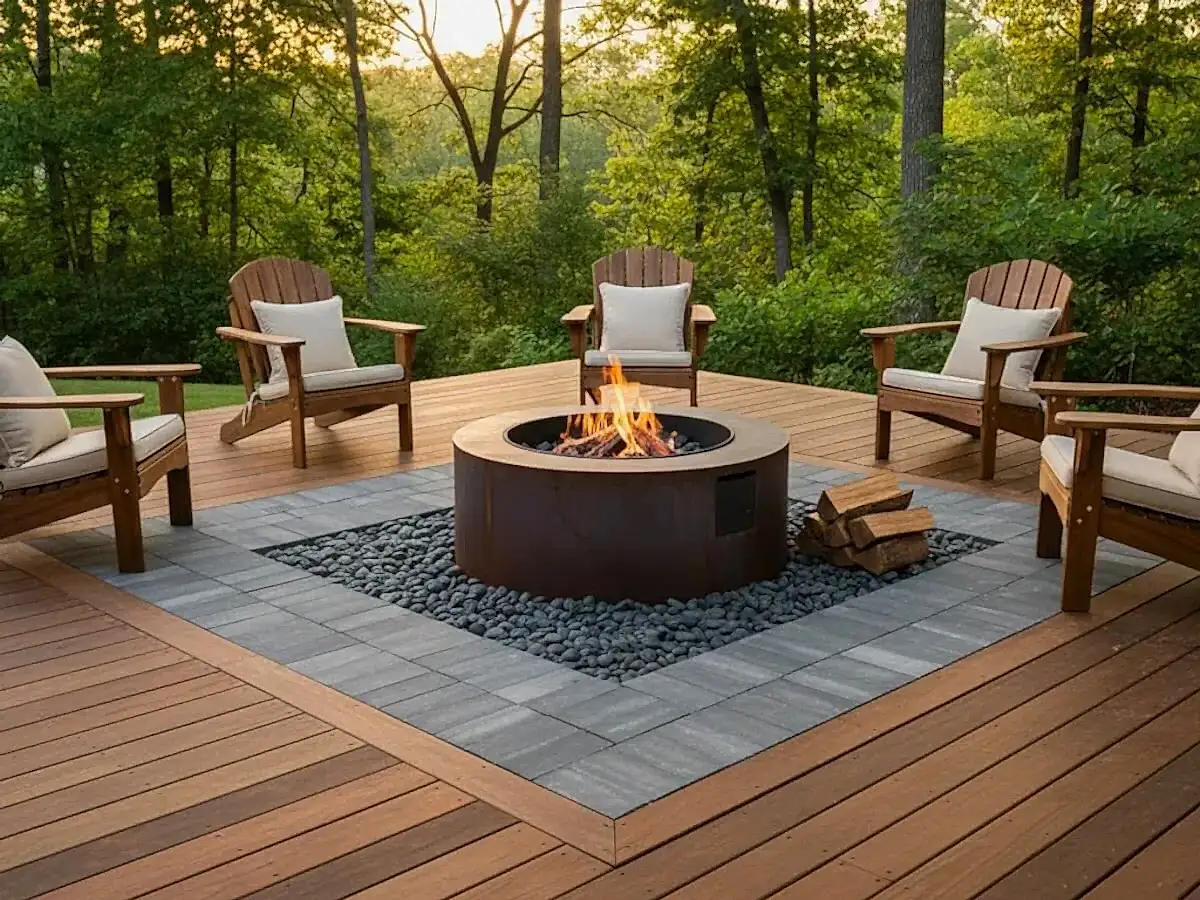
Heat travels downward and can scorch or ignite a deck. Build a rigid, non-combustible base under the fire pit that extends beyond the unit in all directions—commonly pavers, stone, or concrete tiles set over cement board. This “hearth” spreads heat and resists embers. Note that some non-combustible materials (like solid stone) can still transmit enough heat to damage a deck; that’s why a true heat shield layer is helpful too.
Heat Shield Or Fire Mat (Secondary Layer)
A deck-rated heat shield or pit pad below your non-combustible surface reduces heat transfer even further. Look for products specifically marketed for use under fire pits and follow their sizing and standoff guidance.
Spark Control For Wood-burning
If you’re permitted to burn wood, add a spark screen and keep a metal ash bucket with a lid nearby. Screens reduce flying embers; a lidded ash bucket lets you cool and contain spent embers before disposal. Maintain extra clearance when burning wood.
Tools & Supplies (Typical)
- Listed outdoor fire pit approved for use on decks (preferably gas) and its manual
- Non-combustible pavers/stone tiles + exterior-grade cement board
- Deck-rated heat shield or fire mat
- Level, measuring tape, pencil/chalk, straightedge
- Non-combustible shims or spacers (to keep airflow beneath the unit, if required)
- Fire extinguisher (Class A/B/C) and garden hose or water source
- For gas: approved gas line parts, shutoff valve, and pressure test (where permitted)
Step-by-Step: How to Build a Fire Pit on a Wood Deck Safely
Step 1: Lay Out The Location And Mark Clearances
- Measure and mark your required side and overhead clearances from the product manual.
- Confirm at least 10 feet to railings, walls, and anything that can burn—more if your listing requires it.
- Check for overhead branches, pergola covers, umbrellas, or lighting that may be within the no-heat zone.
Step 2: Build The Base
- Sweep the deck and clean debris between boards.
- Place exterior-grade cement board on the deck where the fire pit will sit, then set a layer of pavers or stone tiles on top.
- Extend this base beyond the pit footprint (commonly 12–24 inches in all directions, or as the manual requires).
- If using a heat mat, install it beneath the cement board or as the manufacturer instructs.
Step 3: Create Airflow And Standoff
Many units require air space beneath the burner or bowl. Use the pit’s feet, risers, or non-combustible spacers to maintain the listed standoff distance above the base. Do not rest a hot metal bowl directly on pavers without the required air gap.
Step 4: Place The Fire Pit And Secure Fuel
- Center the unit on the base.
- For gas, follow the manual for hose routing or hard-line installation, shutoff valve placement, and leak testing by a qualified professional where required.
- For wood, confirm the screen fits, keep seasoned wood only, and avoid accelerants.
Step 5: First Burn—go Low And Observe
- Start with a small, low flame or one modest load of wood.
- Monitor the deck surface temperature at the edges of the base and underneath (if accessible).
- Watch for smoke accumulation, shifting tiles, or any scorch marks. Let everything cool completely and recheck fasteners and clearances before your next use.
Using the Fire Pit: Safe Operation & Ongoing Care
Before Each Use
- Clear the area within your listed side clearances and the 10-foot zone from combustibles.
- Remove cushions and low-hanging décor.
- Confirm wind is calm to moderate; skip fires on gusty nights.
- Keep an extinguisher and water source at arm’s reach.
During Each Use
- Keep flames low to moderate on a deck.
- Supervise the fire at all times; never walk away while fuel is burning.
- Keep children and pets outside the hazard zone.
- Do not cook over a decorative gas fire feature unless the manufacturer’s instructions permit it.
After Each Use
- For gas, turn off the gas at the appliance, then at the shutoff valve.
- For wood, let ashes cool fully in the metal bowl, then transfer to a lidded metal container for 24–48 hours before disposal.
- Brush away debris between deck boards; embers and leaves in gaps are a known hazard.
Common Mistakes to Avoid on Wood Decks
Ignoring Local Rules
Even in single-family homes, codes restrict open flames near combustible construction. Multifamily buildings are often stricter—many prohibit grills and open flames on combustible balconies altogether.
Placing A Pit Directly On The Boards
A metal bowl on bare decking can char boards in minutes. Always use a non-combustible base plus a heat shield as specified.
Forgetting Overhead Hazards
Pergola fabrics, umbrellas, tree branches, and string lights are all combustible. Respect the overhead clearance in your manual; when in doubt, increase the margin.
Crowding Furniture And Railings
Soft furnishings, planters, and privacy screens can ignite from radiant heat. Keep the area clear and maintain the required side distances.
Over-fueling Or Using Accelerants
High flames produce more embers and intense heat. Use moderate flames and the fuel specified for your unit.
Frequently Asked Questions
How Far Should My Fire Pit Be From The House And Railings?
Many safety bodies recommend at least 10 feet from structures and combustibles, though your particular model may require more. Always follow the larger requirement between the code and your manual.
Can I Recess A Fire Pit Into A Wood Deck?
Cutting a hole in a combustible deck introduces structural and fire risks. If you’re considering a recessed feature, switch to a listed insert designed for that purpose, build a fully non-combustible surround, and obtain permits and inspections. When in doubt, choose an above-deck unit rated for combustible surfaces.
Are Composite Decks Safer Than Wood For Fire Pits?
Some materials can resist embers better than others, but many composites are still combustible and vulnerable to heat damage. Always treat the surface as combustible and use the same multi-layer protection and clearances.
Step Recap: How to Build a Fire Pit on a Wood Deck (Checklist)
- Verify local rules and any permit needs.
- Choose a listed unit rated for use on combustible surfaces; gas is generally the safer choice on decks.
- Measure clearances—side, below, and overhead—and mark your no-burn zones.
- Build a non-combustible base (cement board + pavers) and add a deck heat shield as directed.
- Maintain airflow beneath the unit and keep flames low to moderate.
- Keep a fire extinguisher and water source nearby; supervise the fire at all times.
- Clean debris between deck boards after every use.
Bring the Warmth Outdoors—Safely—with Intercrus Decks
Ready to add an outdoor flame feature the right way? Our deck builders can plan the layout, build the non-combustible hearth, integrate gas supply (where permitted), and ensure clearances and finishes look clean and consistent with your deck. If you want a safe, great-looking setup—and expert guidance on how to build a fire pit on a wood deck—contact Intercrus Decks to get started today.